Documentation for Moment – Legacy
Theme installation
The easiest way to install the theme, is by accessing your WordPress admin panel, then go to Appearance > Themes. Select the Install Themes tab and click the Upload link located just below the tab’s name. Click on Browse… and select the WordPress theme zip file you just downloaded. Then click the Install Now button, and after a few seconds, your new theme should be installed. Click activate and the theme is ready to use.
In order to install the theme manually, or in case you have trouble installing it through the admin panel, you have to unzip the WordPress theme’s zip file on your computer, and upload via FTP the resulting theme folder into your WordPress installation themes folder (wp-content/themes). Then, from the WordPress admin go to Appearance > Themes. The theme should be available in your themes list. Click activate.
After activation, you will be redirected to the CSSIgniter Settings panel (accessible from Appearance > CSSIgniter Settings) to start customizing your brand new theme.
Importing sample content
The easiest way to get started and find your way around using this theme, is by installing it into a fresh WordPress installation, and importing our sample content.
To get it go to CSSIgniter settings > Site Options, scroll all the way down and click the Download sample content link. Extract the zip file you downloaded and upload the xml file in Tools > Import > WordPress (if not already present, you will be prompted to install the WordPress importer plugin), assing the authors to an existing user and make sure you check the “import attachments” box. You can now import the sample content.
Setting up your theme
1) Creating theme pages
Let’s start by adding pages you are going to need. Go to Pages > Add New and create the following pages:
- “Home” this will serve as your homepage, assign to it either the “Homepage Template” from the “Page attributes” panel.
- “Blog” this will be your posts page. Just create it, no further action needed.
- “Contact” (optional) here you can place your contact form which you will create using the Contact Form 7 plugin.
(TIP, all page titles serve as examples, you can name your pages according to your needs.)
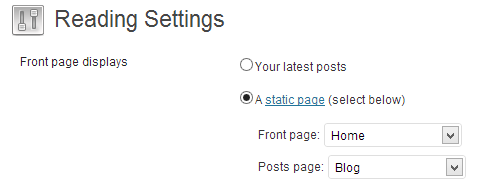
Once the pages are created, navigate to Settings > Reading and set the “Home” page to be your static frontpage and the “Blog” page as your posts page, as demonstrated in the image below.
2) Populating your blog
Moment is all about posts, so let’s see how you can add some. Go to Posts > Add New. Start by giving the post a title and add your text in the text editor. Then add a featured image and move to the Layout panel below the main editor.

Here you can select the post’s layout and the width of the post’s featured image on the homepage.
Available post layouts are:
- Content on the left: The post’s content appears on the left hand side with the featured image on the right.
- Content on the right: The post’s content appears on the right hand side with the featured image on the left.
- Centered – Fixed width: The post’s content appears centered with the featured image above it.
- Centered – Full width: The post’s content appears centered with the featured image above it taking up all the available screen width.
Available widths for featured images on the homepage are:
- Normal square, 425px by default
- Double square, 850px by default
- Wide, 425px by default
- Tall, 850px by default
- Random
Quote boxes: If you want to recreate a quote box like the ones you see on the demo, just wrap your text in blockquote, like this
<blockquote>“Lorem ipsum dolor sit amet, an choro epicuri sea, ad vis falli petentium. Pro at eius ponderum. Odio volutpat no mel, autem vituperata an ius, lorem accommodare sed ad. Unum luptatum quo ad, qui malis repudiandae no. Temporibus complectitur cu quo, pri liber laoreet maluisset ad, usu tota epicurei efficiendi at. Sit ex inermis abhorreant, ut copiosae legendos eam, eu vis soleat euripidis. Ea sed congue utroque, tempor oblique ponderum usu ad, sensibus suscipiantur ex vel..”

<cite>— Author name </cite> </blockquote>
Once you are done, you can publish the post.
3) Creating your menu
Now that your content is in place, you will need a menu. Go to Appearance > Menus, check the pages you want on your menu and add them, give your menu a name and save it. Finally you will need to set your menu as “Main” menu, this can be done either by checking the “Main menu” box in “Menu Settings” just below your menu items in Menu Structure, or by going to the “Manage Locations” tab and selecting the menu you just created.
(TIP, for more info on creating and managing menus, please read the WordPress Menu User Guide here)
The CSSIgniter settings panel
Last but not least, under Appearance > CSSIgniter settings, you can find our custom built settings panel. From here you can manipulate various aspects of your theme, including, but not limited to, changing your logo, setting a custom background, changing color scheme and applying custom styles via the custom CSS tab. All options feature a description so you instantly know their provided functionality.
Additional Information
Useful Plugins
- CSSIgniter Shortcodes you can use our custom made shortcode plugin to help you create a variety of layouts and elements on your site. Instructions can be found here.
- Contact Form 7 use this plugin to create a contact form, then copy the shortcode it gives you and paste it in an empty page.
Image Sizes
The recommended image sizes for the Moment theme are:
- Post thumbnail: 500x350px
- Single post narrow thumbnail: 555x600px
- Single post full fixed thumbnail: 1140x500px
- Single post full width thumbnail: 1920x1000px
- Related post thumbnail: 400x265px
- Front page normal square: 400x425px
- Front page double square: 800x850px
- Front page tall thumbnail: 400x850px
- Front page wide thumbnail: 800x425px