Documentation for Specialty – Legacy
Theme installation
The easiest way to install the theme, is by accessing your WordPress admin panel, then go to Appearance > Themes. Select the Install Themes tab and click the Upload link located just below the tab’s name. Click on Browse… and select the WordPress theme zip file you just downloaded. Then click the Install Now button, and after a few seconds, your new theme should be installed. Click activate and the theme is ready to use.
In order to install the theme manually, or in case you have trouble installing it through the admin panel, you have to unzip the WordPress theme’s zip file on your computer, and upload via FTP the resulting theme folder into your WordPress installation themes folder (wp-content/themes). Then, from the WordPress admin go to Appearance > Themes. The theme should be available in your themes list. Click activate.
TIP: More info on how to download and install a theme here.
WP Job Manager installation
To install the job manager plugin, navigate to Plugins > Add New and search for WP Job Manager. Click the button to install and activate the plugin.
Once the plugin is installed it will create three pages, the Jobs page which is the plugin’s default job listing page, the Job Dashboard page which allows a user to see all job listings they have posted at once and the Post a Job page which allows logged in users to post new job listings. You can add the latter two to the menu to allow businesses to post job listings and also access all their postings. The default jobs listing can be skipped in favor of our custom solution.
Initial configuration
The plugin’s configuration page can be found under Job Listings > Settings, here you can configure the plugin to match your needs. We would suggest enabling Job Categories & Job Types which are by default disabled, you can also enable Multi Category & Multi Type selections, these will make your filtering system much more flexible. In the Job Submission tab you can configure the requirements for allowing users to submit job listings.
For more information the plugin’s extensive documentation can be found here.
Image Sizes
The minimum recommended image sizes for Specialty are:
- Post thumbnail: 850x450px
- Entry items: 264x140px
- Fullwidth featured image: 1140x550px
- Fullwidth narrow: 950x450px
- Company logos: 200px wide
- Hero image: 1920x500px
Useful Plugins
These plugins provide functionality and features used directly (or not) by the Theme. So, it is recommended to install and activate them before importing your sample content.
- Contact Form 7 use this plugin to create a contact form, then copy the shortcode it gives you and paste it in a page which will serve as your contact page.
- WP Instagram Widget: Use the latest version of this plugin to help you display your Instagram feed in any of the theme’s sidebars.
- MaxSlider: You can use our slider plugin to generate sliders for your homepage or any other page you want.
- Wp Job Manager: This is the basic plugin Specialty depends on
- Elementor: Elementor is a free Page Builder tool.
Importing Sample Content using One Click Import
To automate the process of importing and for a better experience we have natively included support for OneClick Import Plugin. Let install it fist:
From your WordPress dashboard
- Visit ‘Plugins > Add New’,
- Search for ‘One Click Demo Import’ and install the plugin,
- Activate ‘One Click Demo Import’ from your Plugins page.
From WordPress.org
- Download ‘One Click Demo Import’.
- Upload the ‘one-click-demo-import’ directory to your ‘/wp-content/plugins/’ directory, using your favorite method (ftp, sftp, scp, etc…)
- Activate ‘One Click Demo Import’ from your Plugins page.
Once the plugin is activated you will find the actual import page in: Appearance > Import Demo Data.
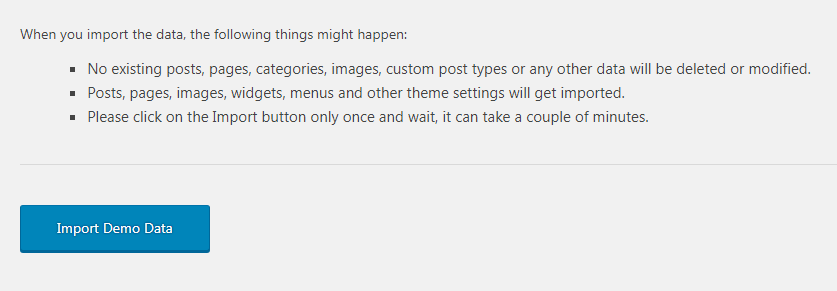
Click on the Import demo data button and you are done!
This plugin requires PHP version of at least 5.3.x, but we recommend version 5.6.x or better yet 7.x. Please contact your hosting company and ask them to update the PHP version for your site.
Adding a new post
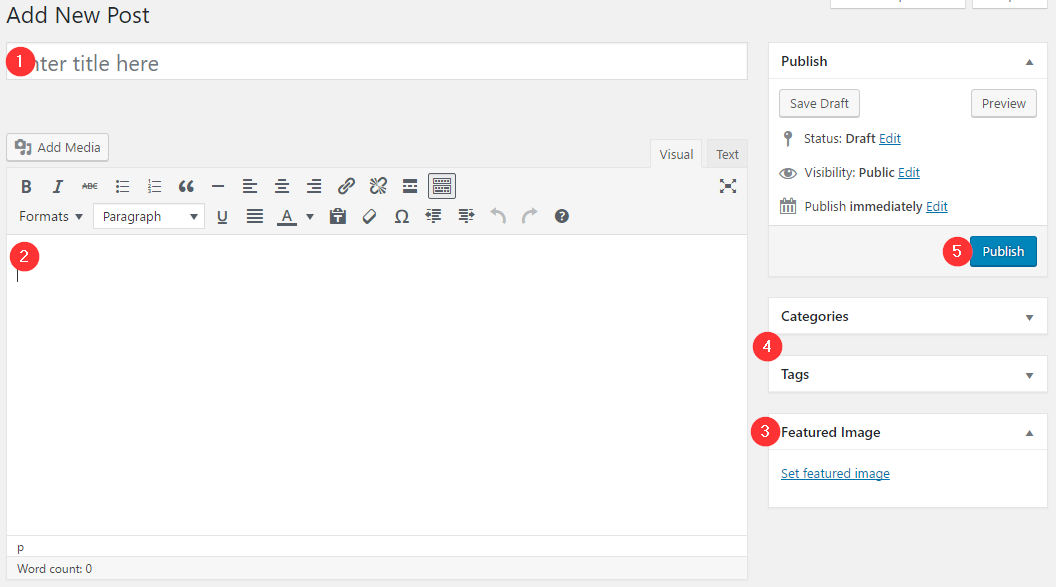
To add new posts to your blog, go to Posts > add new and proceed to:
- add a title to your post,
- enter the content in the editor,
- upload a featured image by clicking “Set featured image” on the Featured Image panel,
- add a category and/or tag to the post,
- once finished click the Publish button to publish the post.
Creating a page for your posts
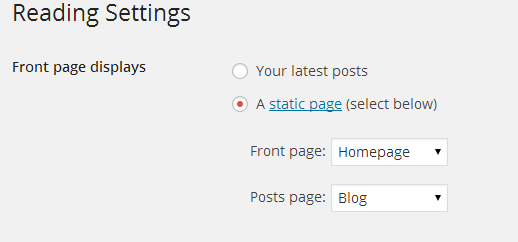
To setup your blog page you can go to Pages > Add New and create a page named Blog. Then navigate to Settings > Reading and set that page as your posts page.
Now you can add that page to your menu to give your visitors easy access to all your posts.
Adding a new Job
To create a new Job listing go to Job Listings > Add New.

Start by adding the title, description, category, type and company logo, once done move on to the Job Data section below.

Most of the fields above are pretty self explanatory, let’s have a look at a couple that might need some explanation. The Position Filled box allows you to mark a position as filled which will disable applications for this particular job listing, filled listings can also be hidden from archives. The Featured Listing box allows to to mark the listing as such, this will make it sticky during searches and it also gives you the ability to style it differently to stand out. Finally the Listing Expiry Date allows you to set an expiration date for the job listing, after that date the listing won’t accept applications, also the content in expired listings can be set to automatically be hidden after the expiration date.
Once everything is filled in you can go ahead and publish the job listing.
Creating a Job Listing page
To do that create a new page and apply to it the Job Listing template from the Page Attributes panel. Then you can select the sidebar’s placement (or choose to not have a sidebar) from the Job Listing Options metabox.

As mentioned earlier the plugin creates a job listing page when installed, however our own listing offers a more refined filtering system as you can see on the theme’s demo, so you might want to use the custom one instead of the default.
Customizing the theme
All the theme’s options can be accessed via WordPress’ customizer. Navigate to Appearance > Customize and you will be presented with this panel.
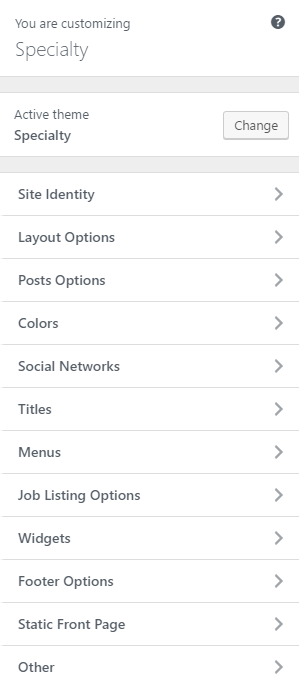
If you have used any theme from the WordPress.org theme directory you should be familiar with the usage of the customizer, if not you can read more about it here. Below we will take a look at the options each section offers.
Site Identity
Here you can set your site’s logo, title, tagline, logo padding and site title.
Layout Options
This tab allows you to customize the excerpt’s length and choose your preferred pagination method.
Posts Options
As you might imagine, this tab helps you configure the layout of single posts. You can toggle the featured image, the categories, date, comments, social sharing icons and related posts. You can also modify the title of the related posts section.
Colors
This tab allows you to customize the appearance of the hero section, text color, background color/image and position.
Social Networks
Here you can fill in all links to your social profiles and display them via a custom widget on any sidebar.
Titles
In this tab you can set titles for the blog section, search and 404 pages.
Menus
Using this tab you can create new or modify existing menus. For more info on menu creation please check our small article here.
Job Listing Options
Here you can toggle the alert creation box and fine tune job reporting functionality.
Widgets
Through this tab you can access all the available theme sidebars and add widgets to them.
Footer Options
Here you can modify the left and right footer texts.
Static Front Page
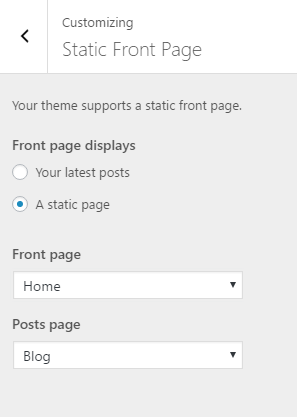
Using this tab we can choose what gets displayed on the front page of our site. For example if we want to create a homepage using a page builder we will need to create a new page using the Page Builder template, name it home and set it as our Front Page above. The Posts Page is the page that will display our post listing, as discussed earlier in the post creation section.
Other
This tab contains the custom CSS box which allows you to add custom styling if you need it. You can also download the theme’s sample content. Here you can also set the Login Page, this is a page that will make logging in a bit easier for your users. Just create a new page, assign to it the Login template and set it as your login page here. All login links will then be redirected to this page.
How to use the page builder template
The theme comes bundled with a page builder template which allows you to use your favorite page builder plugin on it and create unique layouts very easily.
To use that template start by going to Pages > Add New. This will create a new page. Add a title to your page and select the Page builder template from the template drop down in the Page Attributes metabox.
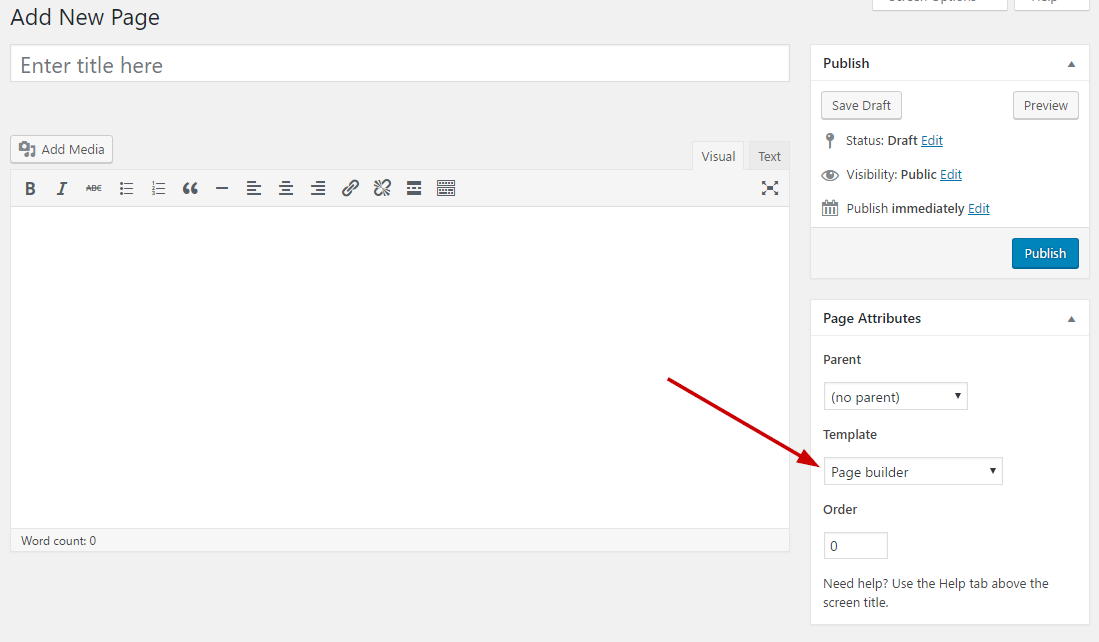
That’s it. You can now start building your page using a page builder of your choice. On the theme’s demo we have used extensively the Elementor page builder plugin.
Widgets

The theme comes with three custom widgets. The Theme – Callout which allows you to create banners easily, the Theme – Related Jobs which displays jobs similar to the one the visitor is currently viewing and the Theme – Social Icons which allows you to display links to your social profiles.
Additional Information
Menu Buttons
If you would like to create buttons on the menu you can use the menu-item-btn class. For info on how to apply it, please read this small guide. (No styling needed on your part, just add the class and save the menu).
Job Alerts Add-on
If you want to use the Job Alerts feature to allow your users to be notified on jobs they are interested in you will have to purchase the plugin’s alert add-on. More info, pricing and purchase options can be found here.
Next Steps
Still have questions or problems setting up your CSSIgniter Theme? We will be happy to help you out! Please visit our support Hub