Documentation for Ignition Widgets for Elementor
Installation
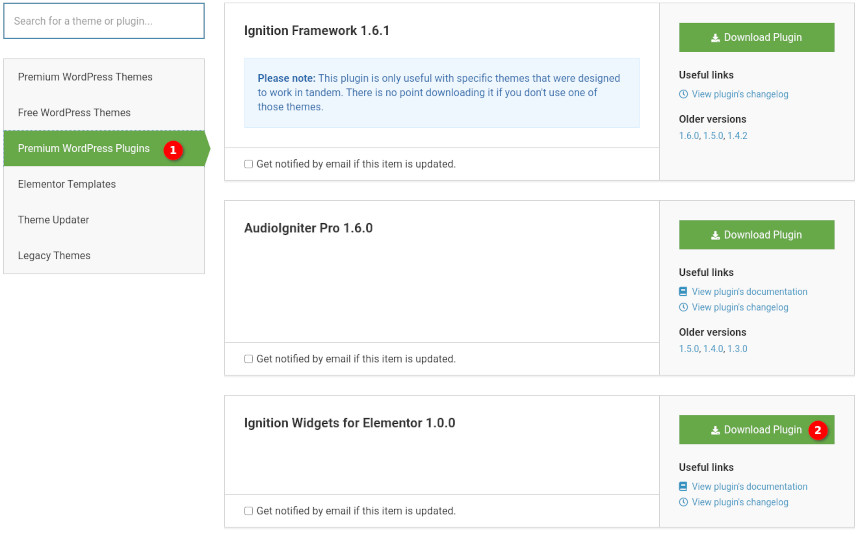
To get the plugin navigate to our downloads section and click on Premium WordPress Plugins, locate Ignition Widgets for Elementor and click the download button.
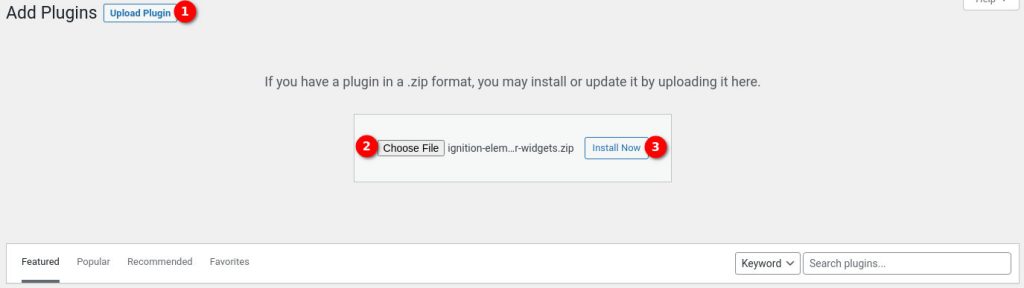
Once you have downloaded the plugin’s zip file, navigate to Plugins > Add New in your WordPress dashboard. Click on the Upload Plugin button, next click Choose File, locate and select the downloaded zip and click Install Now.
After the installation finishes you can press the Activate Plugin button to activate it.
Using the widgets
Edit any post or page with Elementor and scroll down in the widgets list to the Ignition Widgets section. In this section you will find all the available Ignition Elementor widgets, which are described below.
The post types widget
Using the post types widget you can create post grids for any custom post type provided by the theme, with optional category filtering. You can also fine tune the query to return posts based on a certain taxonomy, author and more.
Selecting source posts
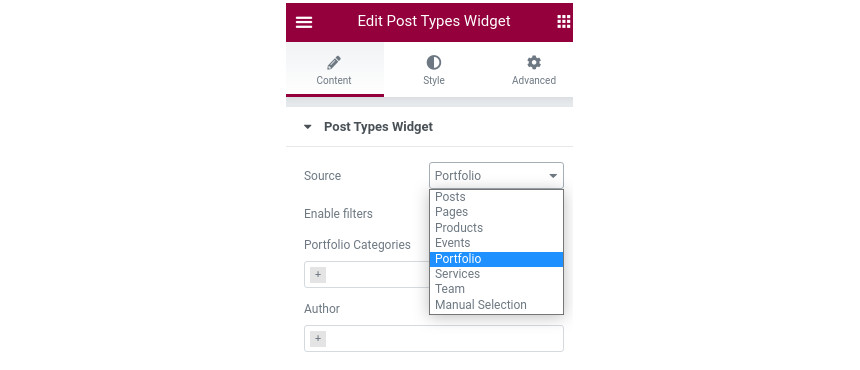
Start by selecting the post type from which you would like to pull posts from. All available post types will appear in the drop down.
TIP: Depending on your activated theme you might get a smaller post type source list than the one pictured above, that’s normal, it just means that your theme does not use these custom post types and does not load them.
Category filtering
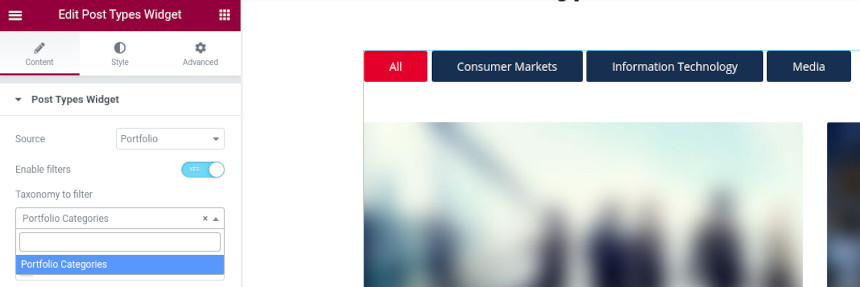
Next you can choose if you’d like to enable category filtering for the post items you will display. To do that toggle the Enable Filters switch and from the drop down select the taxonomy you’d like to base the filtering on.
Query customization
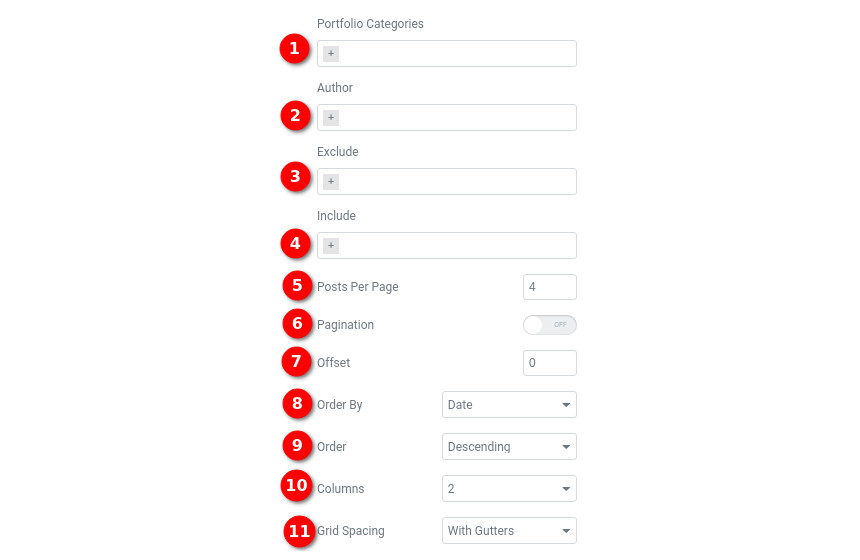
Following the filtering options you will find options to fine-tune the query in order to display just the items you need. Let’s take a closer look at the query options.
- Here you can select taxonomy terms from which you want to pull posts from. So if you need to display posts from one or two categories, you select them here.
- This option allows you to display posts only from one or more selected authors.
- Exclude individual items from the results.
- Include individual items in the results
- Set how many items you want to display.
- Toggle pagination.
- Select the offset you want, if for example you want to skip the first two or three posts because you displayed them above in a hero section, just set the offset to 3 and you are good to go.
- Select the post ordering source.
- Select whether you want posts ordered in an ascending or descending fashion.
- Select the number of columns you want on your posts grid.
- And finally, choose if grid items will have gutters or not.
Element styles
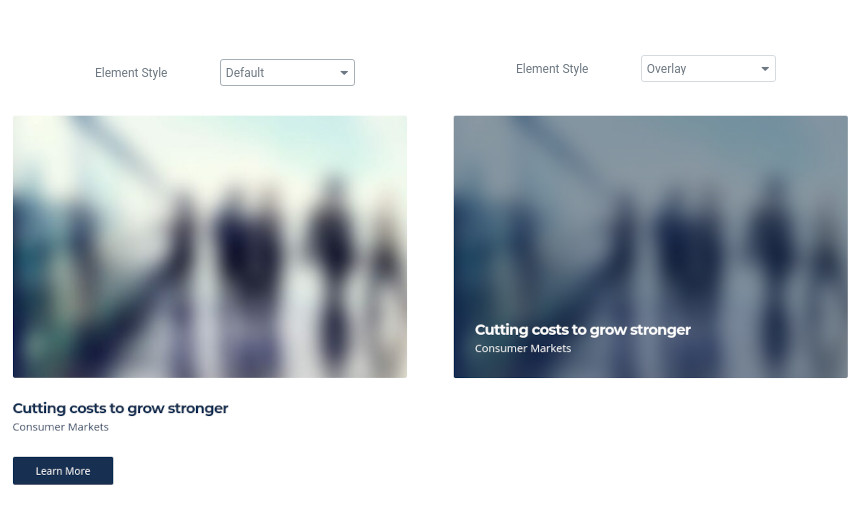
Some themes offer alternative styles for their items. You can select your preferred one from the Element Styles dropdown. In the example screenshot above you can see Convert’s default item style and the alternative overlay offered one.
Color options
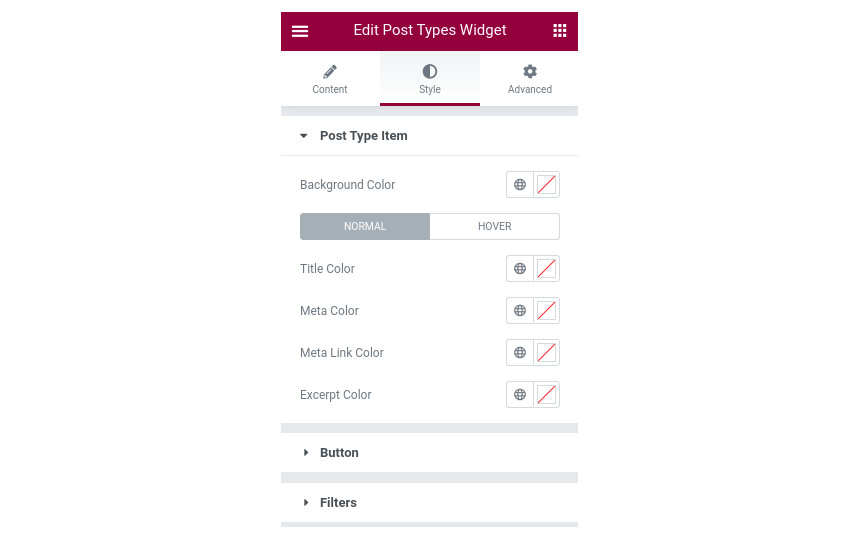
Under the Style tab you will find color options for key item elements such as the title, meta, excerpt and more. Additionally you will find comprehensive color options for item buttons and the filtering system.
Templating
The appearance of listing items on the plugin can be modified thanks to Ignition Framework’s templating system support for which is baked in the Ignition Elementor Widgets plugin. To modify the items on your installation, install your current theme’s child theme and create in it a folder called template-parts and in it a folder called ignition-elementor-widgets. In the template-parts/ignition-elementor-widgets folder copy the two files found in the plugins template-parts folder the article-default.php and the article-media.php. The first file is used on listings with two to four columns, while the second file is responsible for the appearance of items in single column layouts. Edit the files you have just copied over and modify their markup to achieve the layout you want for your post grids.
Icon Box

With the icon box widget you can create a piece of content which displays an icon along with a heading and description.
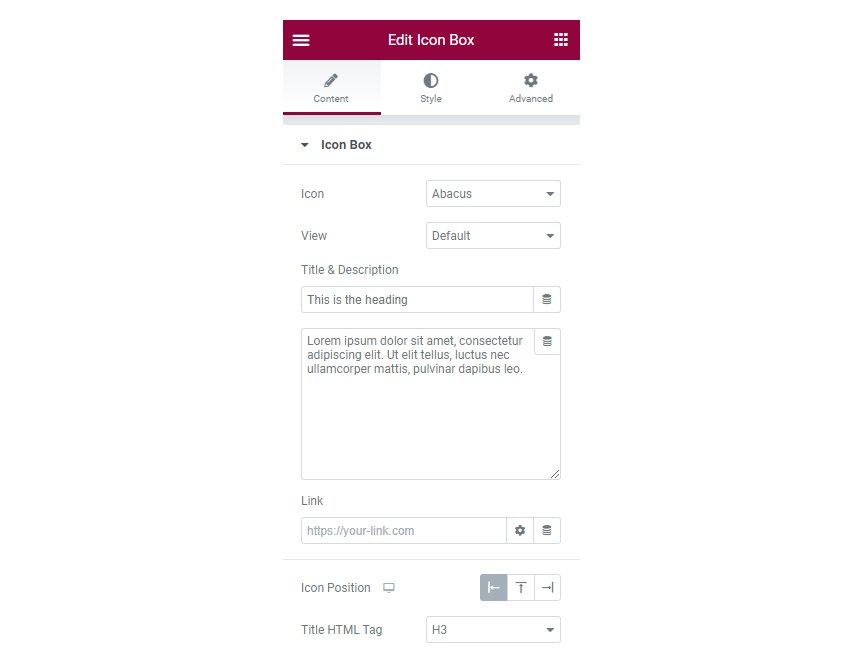
From the content tab you can pick your icon, select if you want a stacked or a framed view for it, set the title & description for the icon box, make it a link if you want to, set the icon’s position relative to the text and finally pick the HTML tag for the title.
Icon box styling
![]()
Under the style tab you can customize the appearance of both the icon and the accompanying text. From the icon section you can modify the icon’s color for normal and hover state, change the spacing between the icon and the text, control the icon’s size, rotate it and add a box shadow.
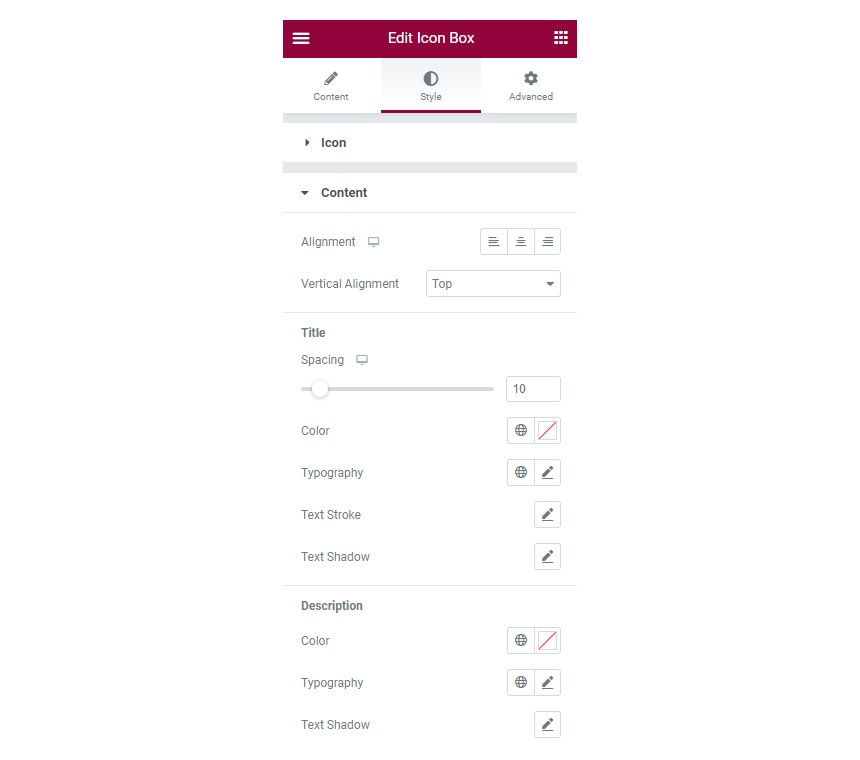
From the content section you can change the text’s alignment and individually control the colors and typography of the title and description.
Food Menu
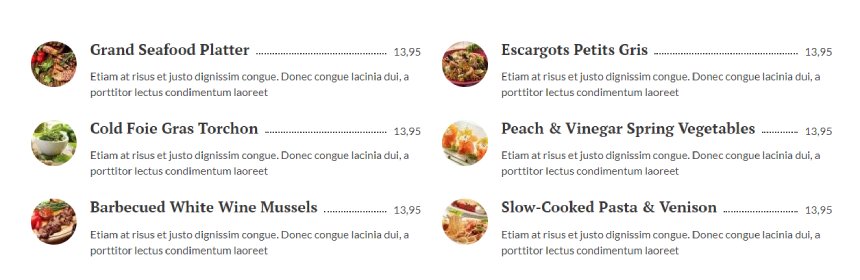
With the food menu widget you can create beautiful menus and pricelists for your restaurant, bar, café and more.
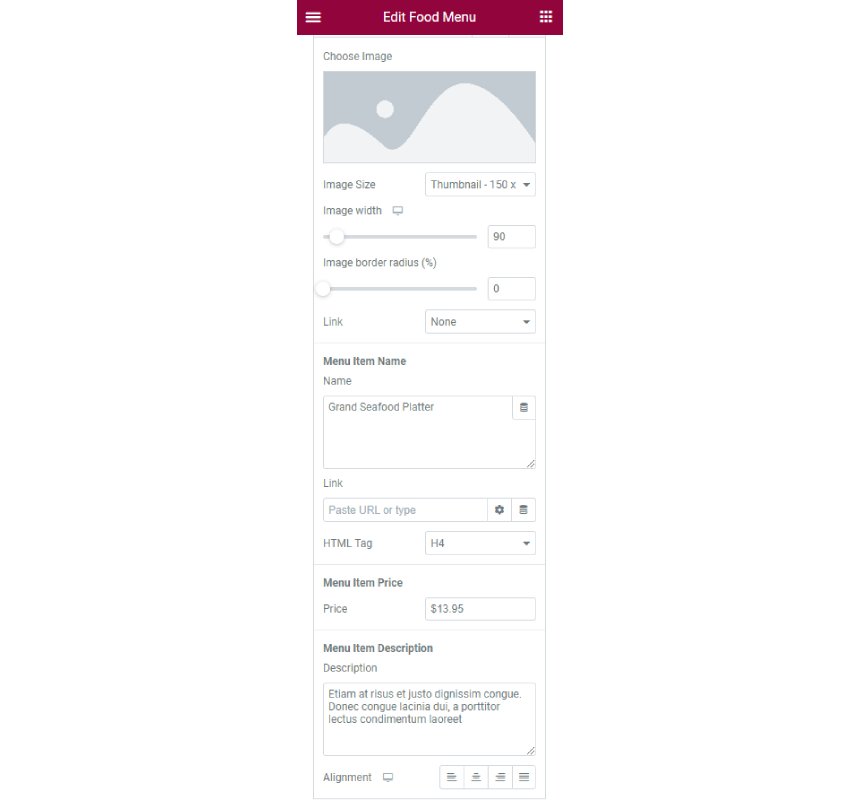
Under the content tab in the sidebar you can control the number of columns your menu will have and then setup each food menu item. Each item accepts an image, a title, a price and a description.
Food Menu styling
Under the Style tab you can individually modify the styling for the food menu title, price and description.
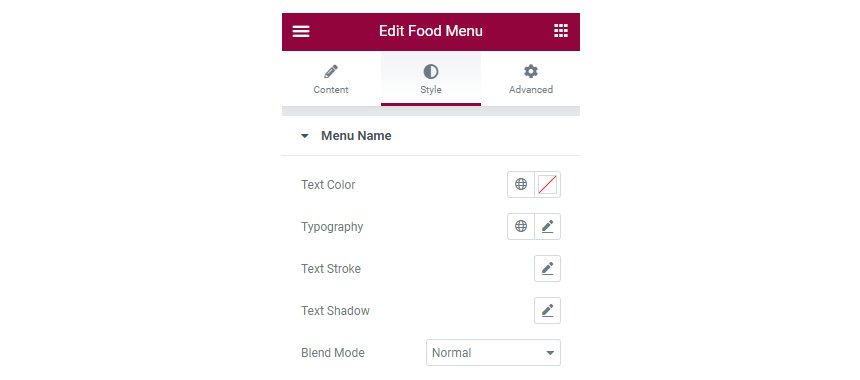
Options include text color, typography, stroke, text shadow and blend mode for each specific section.
Taxonomy Terms
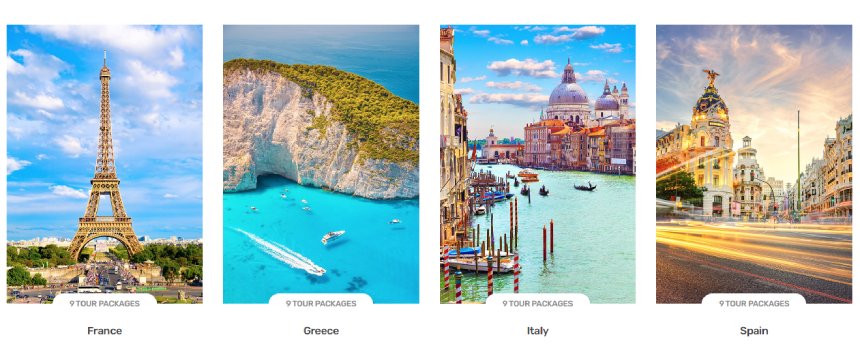
With the taxonomy terms widget you can create grids for any taxonomy term.
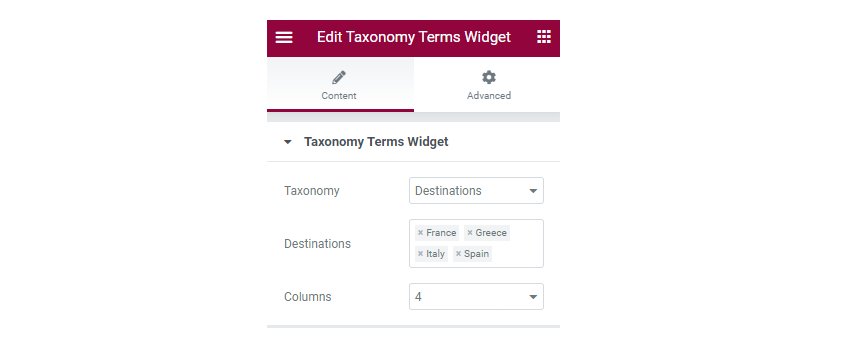
To use the widget drag & drop it in the content, pick your preferred taxonomy, select which items from the taxonomy you want to display, set the number of columns and you are done.
Import Elementor page templates
To gain access to our custom Elementor templates you need to install, activate and configure the CSSIgniter Connector plugin.
Getting Started with the CSSIgniter Connector
Once configured the plugin will provide access to our custom Elementor templates on active subscriptions. If your subscription is a standard club, developer club or lifetime one, you will have access to all available templates, if you have a single theme subscription you will have access to the templates of the particular theme, if available.
Step 1. Download the Connector Plugin
First we will need to download the CSSIgniter Connector plugin. You can find and download the plugin from your Downloads section, alternatively you can get it directly from this URL.
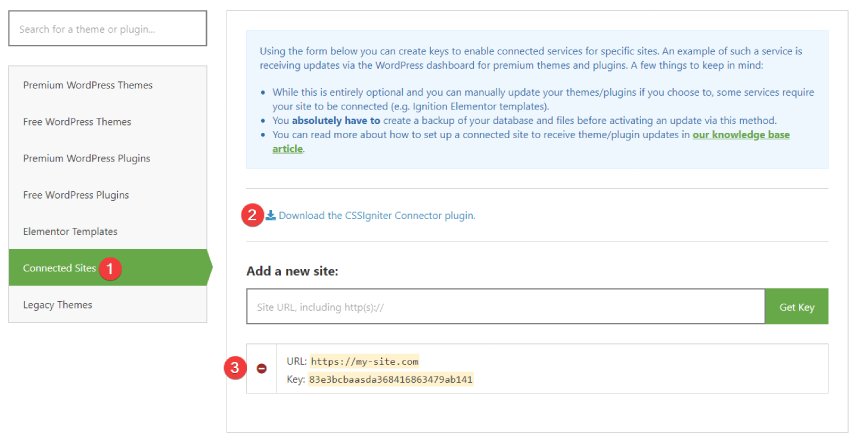
- Navigate to the Connected Sites tab.
- Download the CSSIgniter Connector plugin.
- Any available API keys will appear here.
The plugin will be automatically downloaded to your computer. Keep in mind that Safari sometimes will auto extract the archive by default. Please have a look here on disabling it.
Step 2. Install the plugin
Now, head over to your WordPress installation’s dashboard and:

- Navigate to Plugins→Add New from your Dashboard and
- Click on the Upload Plugin.
Select the plugin archive file you’ve just downloaded, upload and activate the plugin.
Step 3. Connect the Plugin with CSSIgniter
After activating the plugin navigate to Settings→CSSIgniter Connector. You will notice the screen below.
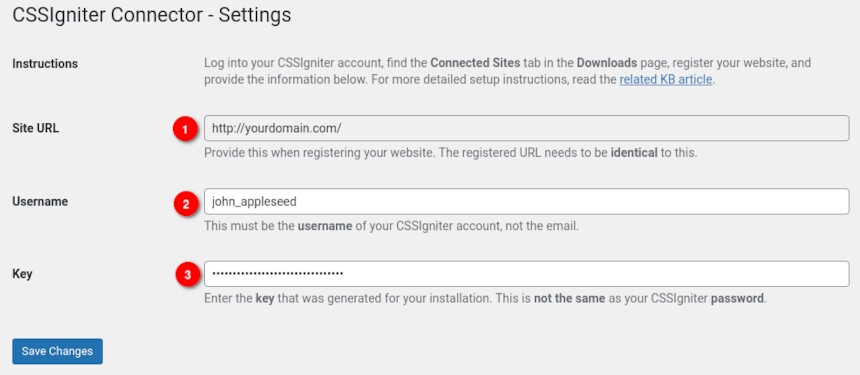
To connect the plugin with CSSIgniter you need three things.
- First your site’s URL, note this down exactly as it appears on the Connector’s settings page
- Your CSSIgniter username (not an e-mail)
- An API key. Let’s generate our API key.
Generate your API Key
Navigate back to your CSSIgniter Downloads page and go to Connected Sites.

- Add your site’s URL exactly as it appears on the Connector’s settings page.
- Click the Get Key button
- Copy the API key.
- Go back to your Connector’s settings page in your site’s dashboard and paste the API Key in the Key input (labeled 3 in the previous to last image) then click Save Changes.
If everything went right you are ready to access our Ignition templates for Elementor.
Access and import the Elementor page templates
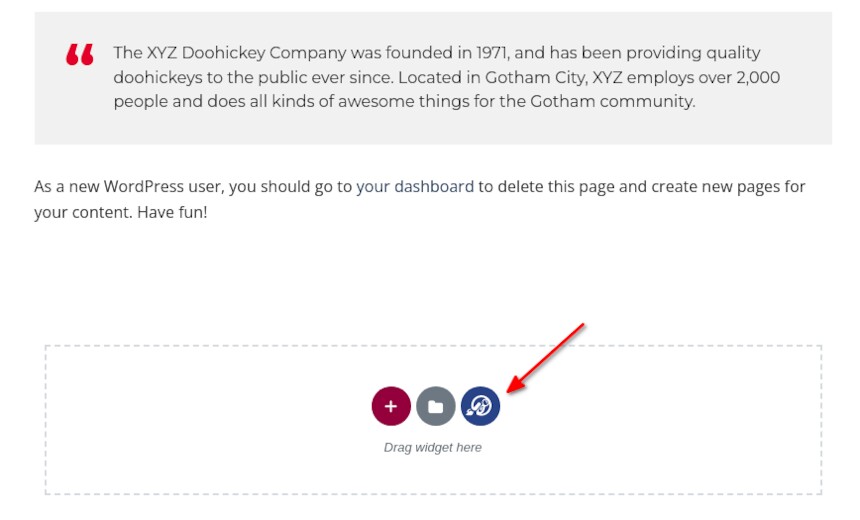
To access the templates you can edit any page or post with Elementor as usual and click the blue button in the add section box.
You will be presented with a pop-up similar to Elementor’s where you will find all the templates available to you, depending on your active subscription.
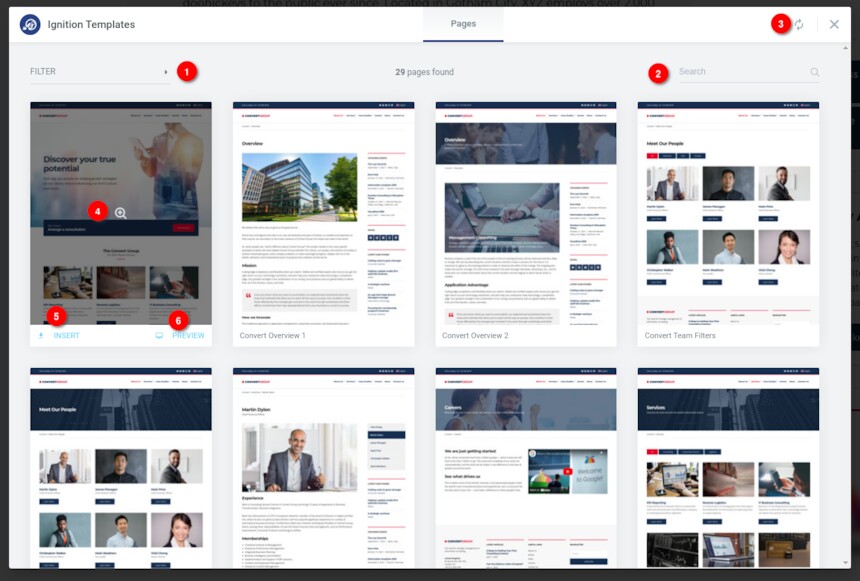
The pop-up shows all available templates in a columned layout. If your active Ignition theme has available Elementor templates these will be presented first. If your account has access to all templates the rest can be access by scrolling down. Alternatively you can use the filter (1) or search (2) functionality to find templates for your desired theme. The plugin will check for new templates regularly, but you can also force an update (3) if you wish to.
Hovering over a template’s card will give you the options to either preview the template (4 & 6) and insert it (5) to the post or page you are currently editing. Once you click the insert button Elementor will download and import the template’s content to your site. Please note that for copyright related reasons you will get blurred versions of the images used on our demos.
Support
Feel free to contact us directly through our support hub if you have questions regarding the plugin’s usage or experience any unexpected issues.