Documentation for EventIgniter
Installing your plugin
To install the plugin simply navigate to Plugins→ Add New in your WordPress dashboard and click on “Upload Plugin” then select the plugin archive and upload your Plugin.
![]()
Next click the Install Now button and wait for the plugin to be installed. Once the plugin is installed you can click the Activate button.
That’s it. The plugin is installed and activated.
Creating a venue
After installing Event Igniter you will notice two new menu items in your WordPress Admin Area.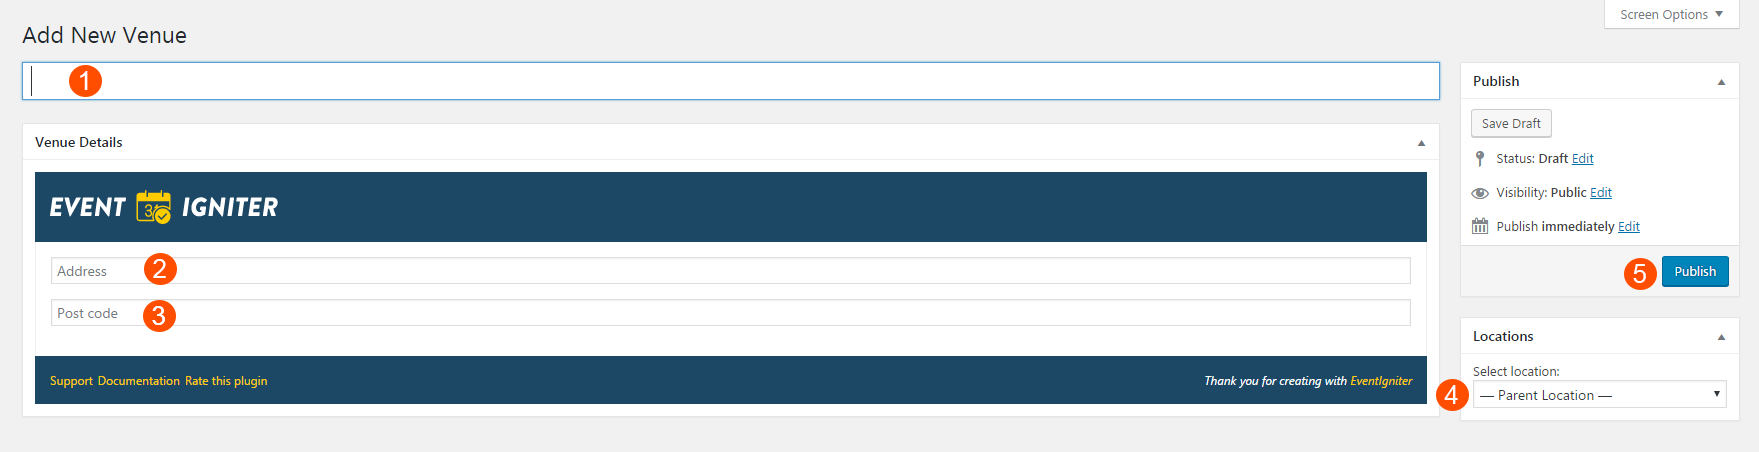
Before creating an actual event we will need to add the place that will host it. So navigate to Venues→Add New in order to add your new place.
- Add your venue name.
- Add the Address of your Venue.
- Add a postcode.
- Select a Location. We have included several countries, but if you wish you can add your own location from Venues→Locations, just like you would add a post category.
- Save your Venue.
Creating an Event
When you are finished setting your Venues, it’s time to create your first Event. Head over to Events→Add New.
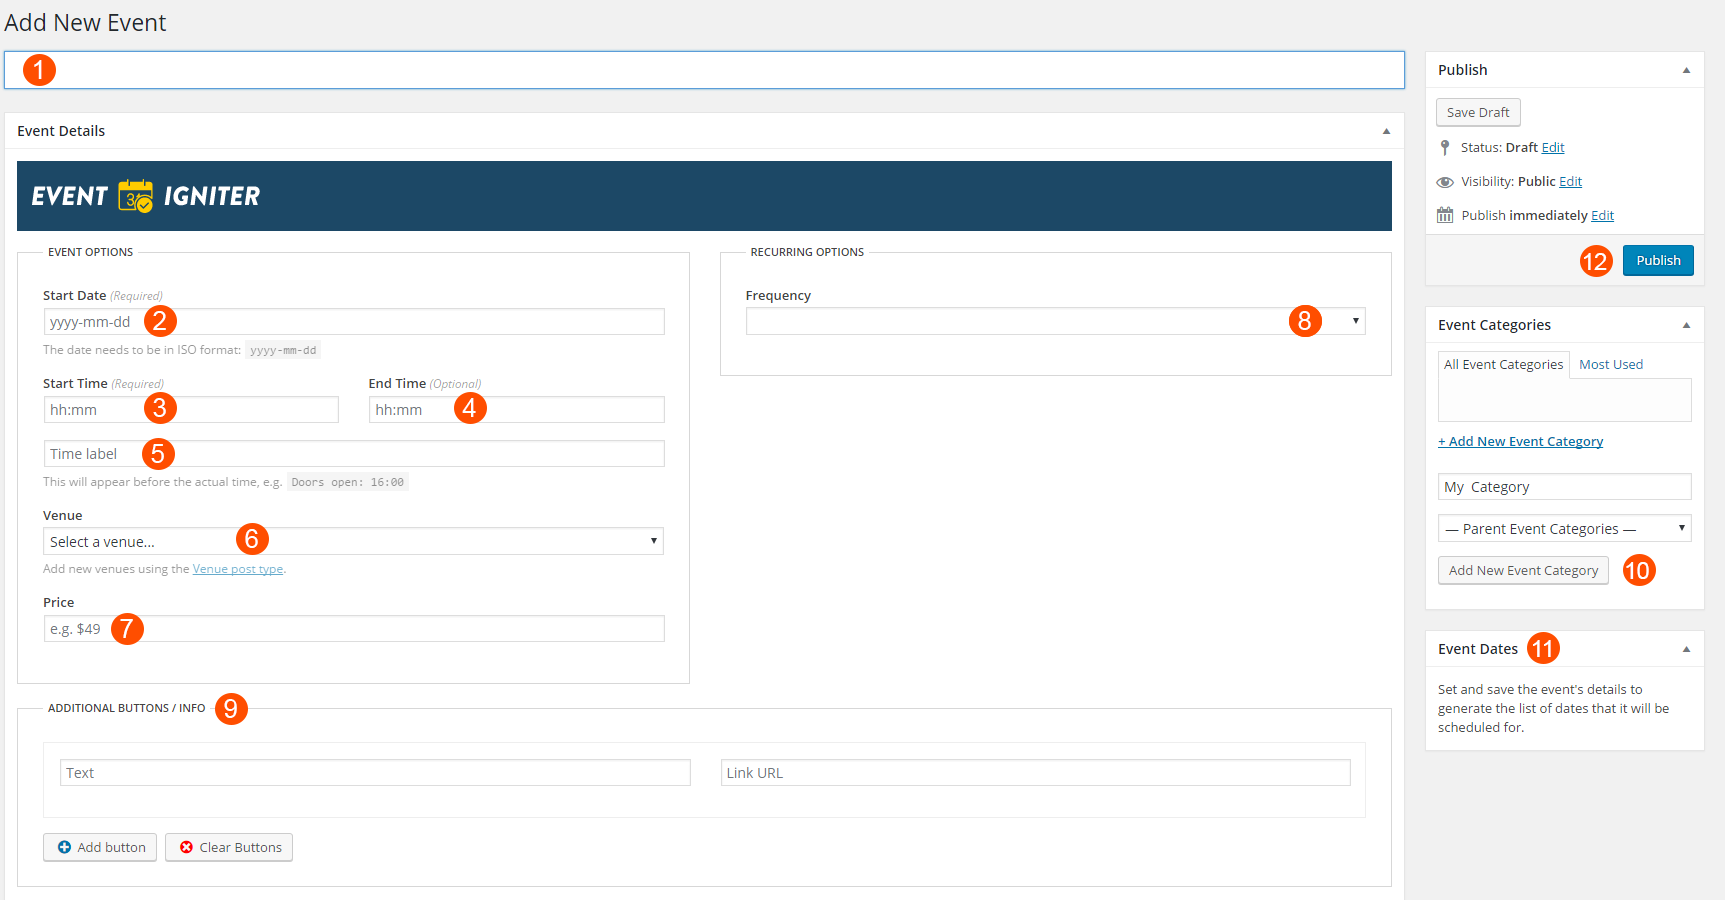
Event Options
- Add your Event Name
- Add the Event Date (yyyy-mm-dd)
- Select the Starting Time
- Select the Ending Time
- Select the Venue that your Event will take place (You can add a new venue from Venues→Add New)
- Add a simple text that will appear before the starting time. For instance: Doors open: 16:00
- Add a Price for your event
- Select a frequency if you need to Repeat your Event ( More on Recurring Options)
- Create buttons with a text and a URL that will appear when your event is rendered.
- Add an Event Category. You can Add Categories for your Events under Events→Categories
- After Saving for the first time you can check your Event Status there.
- Publish your Event
Sold Out / Cancelled Events
After saving your Event you will notice a new Event Dates section displaying one date or a list of dates.
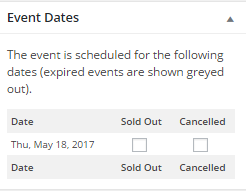
In this section you can mark your Event as Sold Out or Cancelled in a certain date or dates if you have a recurring Event.
Recurring Options
You can select from a variety of scenarios if your event is recurrent. For this we are going to examine them one by one. First select the frequency of your event.
Weekends
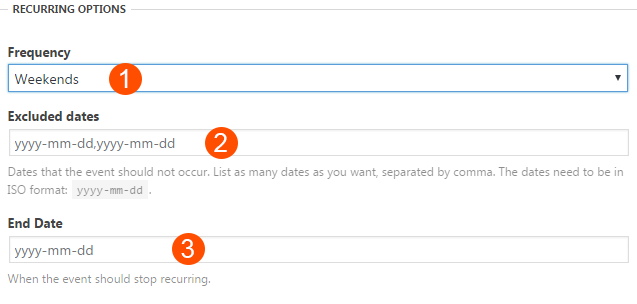
- This event will repeat only in Weekends.
- You can choose the dates you want to exclude separated by comma.
- Choose the End date that the event will stop recurring.
WeekDays

- This event will repeat in all week days.
- You can choose the dates you want to exclude separated by comma.
- Choose the End date that the event will stop recurring.
Daily
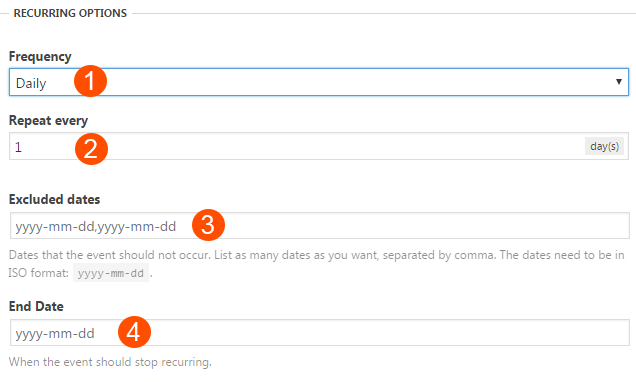
- This event will repeat Daily
- Choose the days you want to repeat the event.
- You can choose the dates you want to exclude separated by comma.
- Choose the End date that the event will stop recurring.
Weekly
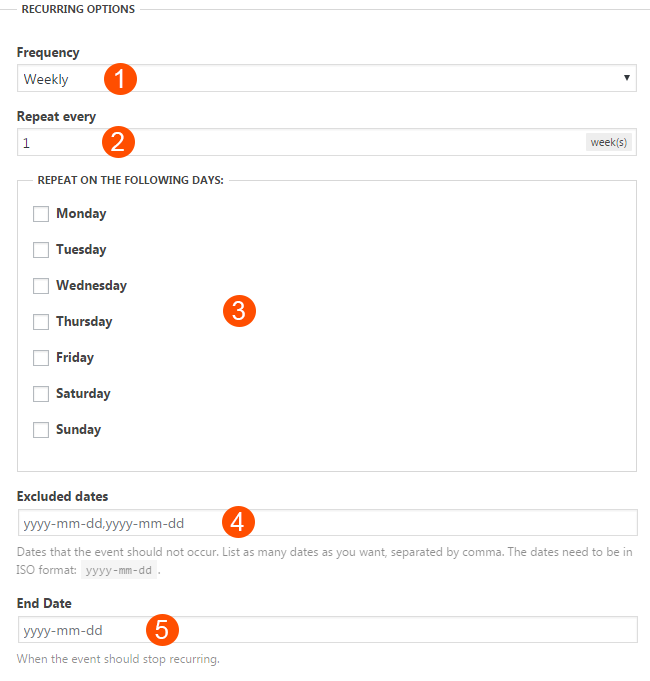
- This event will repeat Weekly.
- Choose the weeks you want to repeat the event.
- Select the Days of the Week you want to repeat the event.
- You can choose the dates you want to exclude separated by comma.
- Choose the End date that the event will stop recurring.
Monthly
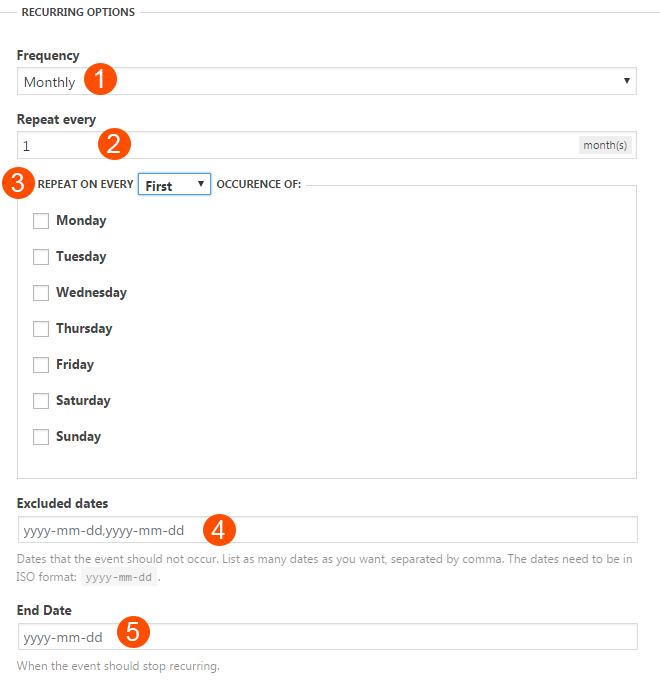
- This event will repeat Monthly.
- Choose the Months you want to repeat the event.
- Choose the First, Second, Third, Fourth or Last occurrence of the day you want to repeat the event.
- You can choose the dates you want to exclude separated by comma.
- Choose the End date that the event will stop recurring.
Yearly
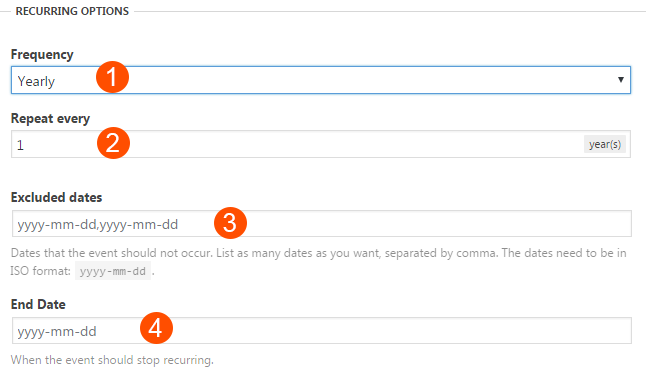
- This event will repeat Yearly.
- Choose the Years you want to repeat the event.
- You can choose the dates you want to exclude separated by comma.
- Choose the End Date that the event will stop recurring
Displaying Your Events
Shortcodes
Paste the plugins shortcodes in any post or page and save, that’s it, you can now see your events in action.
TIP: You can use your shortcodes in in a standard text widget. If you don’t see your events after saving the widget you will need to enable shortcodes in text widgets. Have a look at this article on how to do this.
- Show Events by ID : Only show events with certain Comma-separated IDs. If you have troubles finding the ID’s have a look here.
[events ids="1,3,5"]
- Show Events by Categories: Only show events that belong to these categories. Comma-separated event category IDs.
[events categories="1,3,5"]
- Exclude Events: Show all events except these. Use Comma-separated event IDs. Ignored when combined with the ids=”” parameter
[events exclude="1,3,5"]
- Order Events by by date venue or title.
[events orderby="date"] or [events orderby="venue"] or [events orderby="title "]
- Sorting Events : Affects the orderby parameter. You can sort your events using ASC ( ascending and default) or DESC (descending).
[events order="ASC"]
Expected behaviour when sorting:- When orderby=”date”, events are ordered by the event date ASC/DESC depending on order=””, and then by the event title ASC.
- When orderby=”title”, events are ordered by the event title ASC/DESC depending on order=””, and then by the event date ASC.
- When orderby=”venue”, events are ordered by the venue id ASC/DESC depending on order=””, and then by the event date ASC, and then by the event title ASC/DESC depending on order=””
- Show Events from certain Venues: Only show events that have assigned the following venue IDs.
[events venues="1,3,5"]
- Show Events from certain Locations: Only show events that have assigned venues that belong to the following locations. Use Comma-separated location taxonomy slugs.
[events location="gr, uk, us"]
- Limit Events: List up to that many events. Use positive integer numbers, or -1 for unlimited (default)
[events limit="15"]
Disabling Event Features
- Don’t show the event titles.
[events disableEventTitle]
- Don’t show the venue titles.
[events disableVenueTitle]
- Don’t show the venue address.
[events disableAddress]
- Don’t show the event year.
[events disableYear]
- Don’t show the event buttons.
[events disableButtons]
- Don’t show past events.
[events disablePastEvents]
- Don’t show upcoming events.
[events disableFutureEvents]
- Don’t show the “Add to calendar” link on each event
[events disableEventExport]
EventIgniter Widget
If you need a more powerful option for your Widget Areas you can use the EventIgniter-Events Widget. Navigate in Appearance→Widgets or from your Customizer under Appearance→Customize→Widgets and place the widget in any Sidebar you want.
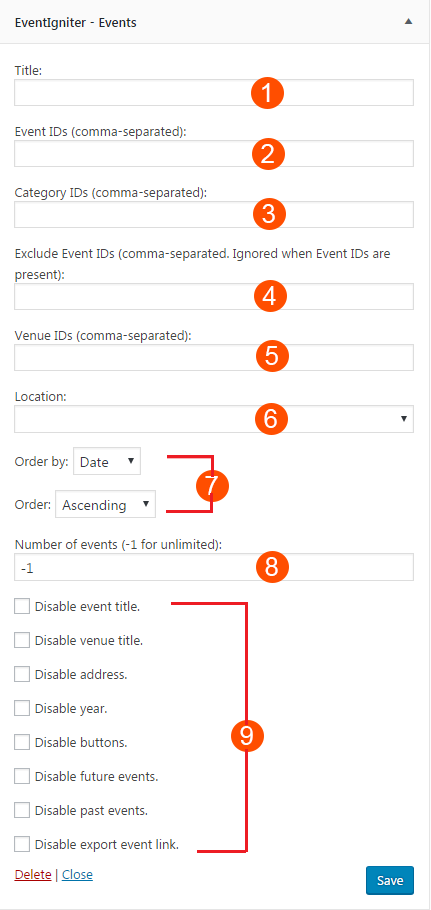
- Add your Widget Title
- Add your events IDs separated by a comma
- Or Add your event categories IDs separated by a comma
- Add the ID’s or events you want to exclude
- Add a Venue ID that you want its events to display
- Select a Location that you want its events to display
- Select the Ordering of your events
- Set the number of Events you want to display.
- Disable features that your don’t want to appear in your Event Listing
Customizing EventIgniter
You can customize EventIgniter Color Palette and typography from Appearance→Customize→EventIgniter
General
Here you can select if you want the Event listing to have the default EventIgniter typography or use your theme’s default one.
Calendar
Here you can change the colors of the mini calendar next to your event’s information.
Event
Here you can change the colors of your event.
Next Steps
Still have questions or problems setting up your CSSIgniter Theme? We will be happy to help you out! Please visit our support Hub